Blog
 Anne
AnneUnleash Your Brand’s Voice
In the bustling world of e-commerce, standing out visually is more critical than ever. Your brand’s visual identity is the silent salesperson, the first impression that captures attention and builds trust. And guess what plays a starring role in this visual symphony? Fonts.
Think about it: fonts are more than just letters on a screen. They whisper personality, shout authority, and sing elegance. A playful, rounded font can scream fun and approachability, while a sleek, sans-serif font might project modernity and efficiency. Choosing the right font is like selecting the perfect outfit for your brand – it needs to reflect your values, resonate with your audience, and leave a lasting impression.
Shopify understands this power, offering a fantastic library of fonts right at your fingertips. From classic serifs to trendy sans-serifs, you can find a wide array to suit many aesthetics. However, sometimes “good enough” isn’t enough. Sometimes, you crave that unique, signature font that truly embodies your brand’s spirit. Maybe you’ve invested in a custom font as part of your branding strategy, or you’ve stumbled upon the perfect typeface that’s not in Shopify’s default selection.
That’s where custom fonts come into play. Adding them to your Shopify store allows you to break free from the standard options and inject unparalleled personality into your online presence. It’s about taking control of your visual narrative and ensuring every aspect of your store, down to the very letters, screams you.
Ready to take your Shopify store’s typography to the next level? Let’s dive into two straightforward methods to seamlessly integrate custom fonts and truly make your brand voice heard (and seen!).
Method 1: The Custom CSS Route - For the Hands-On Designer
If you’re comfortable diving into the code side of things and want a direct, efficient approach, using Custom CSS is your go-to method. This technique involves uploading your font files directly to your Shopify theme and then telling your store how to use them. Don’t worry, it’s less intimidating than it sounds!
Before making any code modifications, always ensure you create a copy of the theme first. Test all your changes on this copy to confirm everything works perfectly before publishing it to the live theme. This precaution helps prevent any issues from affecting your main theme and keeps your work safe.
Here’s how to bring your font files into the Shopify fold:
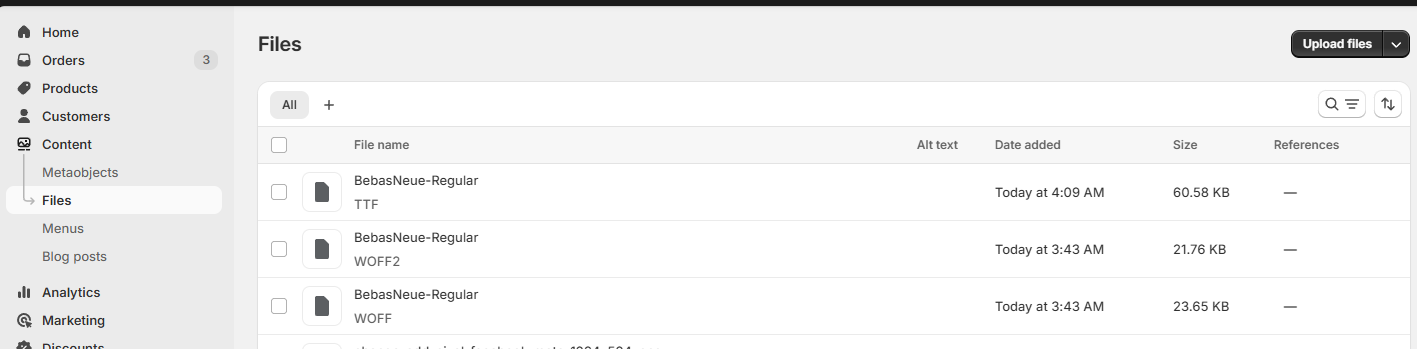
Upload Font Files to the Assets Folder:
First, navigate to your Shopify admin panel. From there, go to Content and then click on Files.
Click on Upload Files. A window will pop up allowing you to upload files. This is where you’ll upload your font files. Common formats include
.woff,.woff2and.ttfMake sure to upload all font file formats (e.g.,
.woff2,.woff,.ttf) to ensure cross-browser compatibility.
Edit the CSS File:
Then, open the theme code editor. In the Assets folder, look for your theme’s main CSS file. Common names for this file are theme.css or base.css. The exact name might vary depending on your theme. Click on the file to open it in the code editor.
Now, we need to use the
asset_urlfilter to reference the font files in your Assets folder. Add the following CSS to your CSS file:
@font-face {
font-family: 'BEBAS NEUE';
src: url('https://cdn.shopify.com/s/files/1/0820/3898/0894/files/BebasNeue-Regular.woff2?v=1744789418') format('woff2'),
url('https://cdn.shopify.com/s/files/1/0820/3898/0894/files/BebasNeue-Regular.woff?v=1744789417') format('woff'),
url('https://cdn.shopify.com/s/files/1/0820/3898/0894/files/BebasNeue-Regular.ttf?v=1744790967') format('truetype');
font-style: normal;
}
body {
font-family: 'BEBAS NEUE', sans-serif;
}
Replace the URL with the actual URLs of the font files you uploaded to Content.
Save and Preview:
After adding the code, click Save.
Preview your store to see if the custom font is being applied.
Once you’ve completed these steps, your custom font files are ready to be used!
Method 2: Leveraging Google Fonts (and Similar Services) - For Easy Integration
Google Fonts is a treasure trove of free, high-quality fonts, and it offers a super convenient way to integrate fonts into websites, including Shopify stores. This method is fantastic if your desired custom font is available on Google Fonts (or another font service that provides embed codes).
Let’s walk through how to bring the power of Google Fonts to your Shopify store:
Step 1: Add the Google Fonts Embed Code
Go to Google Fonts: Open your web browser and navigate to the Google Fonts website.
Search for Your Font: Use the search bar on the Google Fonts website to type in the name of the font you want to use. In this example, let’s imagine you want to use “Bebas Neue”. Once you find it, select the font family.
Copy the Embed Link: Google Fonts will generate an HTML <link> tag. This tag is what connects your website to the Google Fonts library. Copy this entire <link> code.
Here is an example link:
<link href="https://fonts.googleapis.com/css2?family=Bebas+Neue&display=swap" rel="stylesheet">Step 2: Add the Embed Code to Your Shopify Theme
Go to your Shopify Admin: Navigate to Online Store > Themes.
Edit Code: Click on Actions > Edit Code for your current theme.
Open theme.liquid file: In the code editor, look for the Layout folder and open the theme.liquid file.
Paste the Embed Code: Scroll down within the theme.liquid file until you find the <head> tag. You’ll want to paste the Google Fonts <link> code you copied inside the <head> tag, right before the closing </head> tag. It should looks like this:
<head><link href="https://fonts.googleapis.com/css2?family=Bebas+Neue&display=swap" rel="stylesheet"> </head>Step 3: Use Your Google Font in Your CSS
Find and Edit Your CSS File: Go back to the Assets folder and find your theme’s CSS file (like theme.css or styles.css). Open it for editing.
Apply the Font in CSS: Now, you can use the Google Font in your store’s styling. In your CSS file, target the elements you want to style with your Google Font. For example, if you want to apply “Bebas Neue” to all your headings, you would use CSS rules to target h1, h2, h3, etc., and set their font-family property to the name Google Fonts provides (which is usually mentioned when you select the font on their website, often in the “CSS rules to specify families” section). You can also apply it to the body element to change the default font for all text on your store.
body { font-family: 'Bebas Neue', sans-serif; } h1, h2, h3 { font-family: 'Bebas Neue', sans-serif; }
Step 4: Save and Preview
Save Changes: Don’t forget to click Save the changes.
Preview Your Store: Now, go to your online store and preview it. You should see your chosen Google Font, like “Bebas Neue” in our example, applied to the elements you styled in your CSS.
Fontastic Finishes!
Adding custom fonts to your Shopify store is a powerful way to elevate your brand’s visual identity and create a truly unique online experience. Whether you choose the Custom CSS method for full control or the ease of Google Fonts integration, the result is a more personalized and impactful brand presentation.
So go ahead, explore the world of typography, find that perfect font that speaks volumes about your brand, and watch your Shopify store transform into a visually captivating destination! Happy designing!
For any questions or further assistance, please don't hesitate to reach out. Simply leave us a message, and we will respond to you as soon as possible. We're here to help and look forward to working with you!